Depence R4
  • Depence R4 Documentation
  • Getting Started
    • Installation
      • Update
      • Start Options
    • Projects
    • System Requirements
    • Graphics Hardware
  • Program Overview
    • Workspaces
    • Windows
    • Supported File Formats
      • Supported 3D-Model Import Formats
      • Supported Image / Texture Formats
    • Camera & Navigation
    • Render Views
      • Quad View
      • Background Image
    • Shortcuts
    • Fixture Manager
    • Auto Backup
  • Construction
    • Scene Graph & Grouping
      • 3D Hierarchy Filters
      • Group Objects
    • Object Extensions
      • Depending Visibility
      • Spline Arrange
      • Reflector
    • Layers
    • Editor Tools
      • Selection
      • Move Objects
      • Rotate Objects
      • Transformation
      • CAD Editor Snapping
    • Splines
      • Draw a Spline
      • Circle Spline
      • Rectangle Spline
      • Star Spline
      • Formular Spline
    • Nurbs
    • Add Fixtures and Objects
      • Fixture Hang Tool
    • Connect Dependencies
      • Manual Connect
      • Distributors
      • Auto Connect
      • Disconnect
    • Terrain
      • Terrain Sculpting Tool
      • Terrain Painting Tool
      • Terrain Mass Placement Tool
    • Atmosphere
    • Crowds
    • Import 3D Models
      • Tips & Tricks for 3D modeling
    • Arealights
    • Materials
      • PBR Material
        • DMX Control
        • DMX Matrix
        • Chroma-Key
      • Water Material
      • Video-Wall Material
    • Video Sources
      • Camera Video Source
      • Media-Player
      • NDI Video Source
    • My Library
    • Fixtures
      • Lighting Fixtures Settings
      • Modular Fixtures
      • DMX Motors
      • Channel Patch
      • Patching and Multiple DMX Address
      • Replace a fixture by another one
    • Laser
      • Connect Pangolin Beyond
      • Connect Lasergraph DSP
    • Firework
      • Firework by DMX
      • Timeline workflow
        • Alignment
        • Arrange Events
        • Stepper
        • Spline-Positions
      • Build custom Effects
        • Generic Firework Objects
        • Shell
        • Stars
        • Tail
        • Crackle
        • Cake Box
    • Decals
    • MVR
    • Drones
  • Show & Animation
    • Selection Groups
    • Schematic Views
    • Repository
      • Team Management
      • Scenes
        • Scene Fade / Delay Path
      • Audio & Video Files
      • Sequences
      • Playlists
      • MsgCues
      • Scripts
      • Profiles
      • Virtual Masters
    • Programmer
      • Table View
      • Full Open
      • Release/Clear
      • Value Editors
        • Value
        • Position
        • Color Mix
        • Effects
          • Wave FX
          • Color FX
          • Position FX
      • Panorama Alignment
      • Post Selection
      • Store a Scene
      • Palettes
        • Store values in Palette
        • Use a Palette
        • Edit Palette Values
    • Selection Tool
    • Show Sequencer
      • Track Types
        • Repository Scene Track
        • Any Scene Track
        • Fixture Group Tracks
        • Sequence Track
        • Audio Track
        • Video Track
        • DMX-Stream Track
        • MsgCue Track
        • Script Track
        • Multimedia Stream Track
        • Master Track
        • Speed Master Track
        • Intensity Master Track
        • Parameter Tracks
        • Marker Track
        • OSC Track
        • OSC Track
      • Editor
      • Scene Event - Blocks
      • Loop Region
      • Keyframe Animations
        • Easing Options
        • Spline Mode
        • Rail Rotation
      • Camera Animation
      • Sequencer Settings
      • Automatic Light Control (ALC)
      • Using MIDI keyboard.
  • Rendering
    • Video Rendering
      • Render H.264
      • Render Image Sequence
      • Physics and Framerates
      • Synchronize Pangolin Beyond for Video Rendering
    • Image Rendering
      • Long Exposure Rendering
    • Render Settings
      • Scene
      • Lighting
      • Laser Render Settings
      • Fountain
      • Post-FX
    • Virtual Reality
  • Plot & Documentation
  • Hardware & Control
    • Connect to vServer or vNano/wecs
    • Connect a Console
    • Modules
      • NDI
      • Logic Module
        • Logic Module Items
          • External Devices
          • Tools
          • Events
          • Outputs
          • Conditions
          • Inputs
          • Status
          • Tracker
          • Transformation
          • Converter
          • Container
          • Logic Test
          • Syncro Cloud
        • Group Items on a Group Panel
        • Connect a digital Wind Anemometer
        • Connect an analog Wind-Anemometer to a v:Server
        • Routing different DMX universes to the 4 XLR outputs of the vServer
        • Connection example for recording DMX values via the 4 DMX XLR connectors of the vServer.
        • Assign DMX universes to different ArtNet nodes or other Devices.
      • Scheduler
        • Day Schedule
        • Week Schedule
        • Year Schedule
      • ModBus
      • Synchronization
      • Viz-Key
        • Install Viz-Key Driver
        • Connect Depence to a grandMA3 session
        • Potential Issues and Limitations
      • vServer Test Period
    • Live-Panel
    • Scripting
    • Editing the scheduler with the additional 'ShowOrganizer' program
  • Tips & Tricks
    • Network Settings
    • How to use a DeskDough?
    • Using Variables
    • How to export MVR to grandMA3
    • Control Atmosphere by DMX
    • Camera Remote Control
    • Log files
  • Performance
    • Scene Organization
    • Lighting
    • Other optimizations
  • Release Notes
    • Version 4.0.5
    • Version 4.0.0
Powered by GitBook
On this page
  • Wiring
  • Setup Analog Ports on the V:Server
  • Create a Virtual Master
  • Setup Logic Module
  • Assign the Virtual Master to Pump Fixtures
Export as PDF
  1. Hardware & Control
  2. Modules
  3. Logic Module

Connect an analog Wind-Anemometer to a v:Server

PreviousConnect a digital Wind AnemometerNextRouting different DMX universes to the 4 XLR outputs of the vServer

Using an anemometer you can easily control the maximum fountain height for a group of fixtures.

Wiring

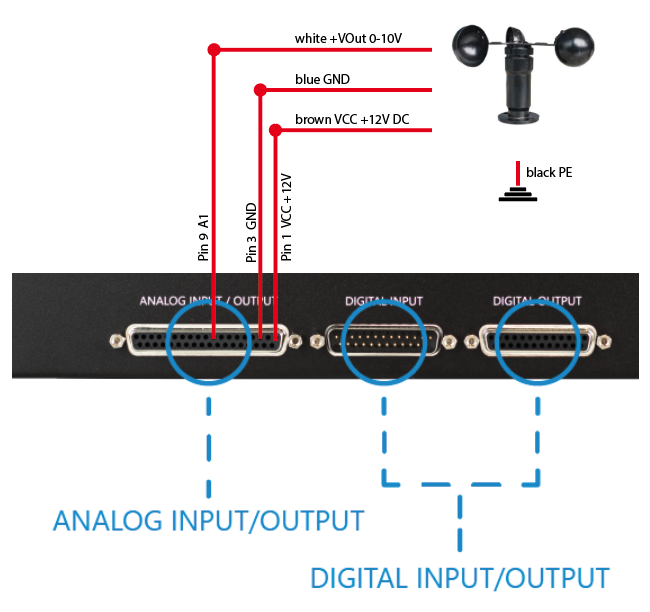
The Syncronorm Analog Wind Anemometer 0-10V comes with a supplied cable that has 4 connectors.

Number
Color
Function

1

brown

VCC+ 12V DC

2

white

+VOut 0-10V

3

blue

GND

4

black

PE

Connect the Syncronorm Analog Anemometer as described in the diagram. You can find a complete pin assignment for the connection in the user manual of the vServer.
Setup Analog Ports on the V:Server

In the next step, the analog connection pin No.1 needs to be configured to an input. To do this, click on the "Digital Analog I/O" tile on the vServer screen.

You will then be directed to the configuration page for the analog and digital I/Os
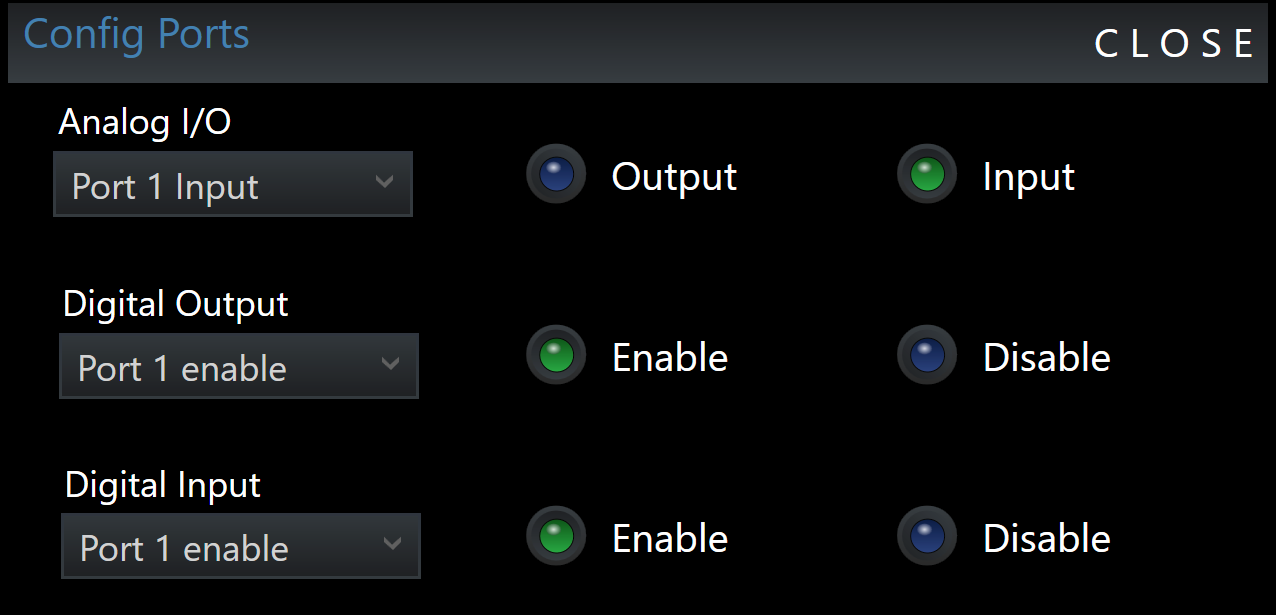
Now, from the Analog I/O dropdown menu, select Port 1 and then press the Input button.

Press 'Close' to close the dialog.

Create a Virtual Master

to maximize or scale the output value of DMX channels we are assigning Virtual-Masters, which are a factor to the bound DMX channel. 1. Navigate to Repository Window > Virtual Master 2. Right-Click > New... 3. Name it "WindLevel"

Setup Logic Module

Everything is now correctly connected and set up on the vServer. In the next step, we need to query Analog Input 1 in the "Depence" LogicModule and link it with the Wind Analyzer.

This then controls the maximum pump level via a connected Virtual Master. For more details, refer to the chapter 'Logic Module / Logic Module Items' for the description of the Wind Analyzer.

Using the Static Value component, a BIAS can be multiplied with the analog input value of 0-100% to get to the correct input unit of meters per second. You can find the conversion factor in the respective operating manual of the wind anemometer.

Assign the Virtual Master to Pump Fixtures

Next, the pump heights need to be linked with the created Virtual Master "Wind Speed" via the speed control. To do this, select the appropriate pump fixture group. Then, in the settings window, click the 'Channel Settings' button.
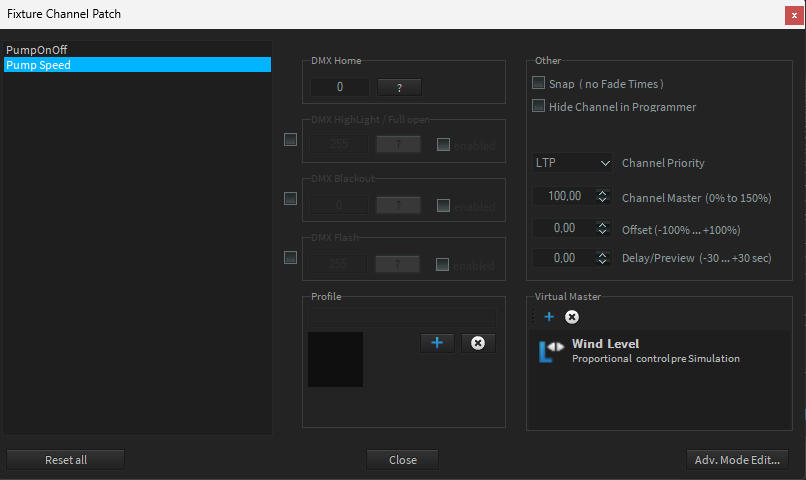
Now, select the 'PumpSpeed' channel and then, in the 'Virtual Master' group window, use the '+' button to assign the previously created Virtual Master named 'Wind Level' from the repository.

Caution: Don't forget to transfer the project to the vServer after configuring the Logic Module and Virtual Master!

Sample configuration for wind level.